[WPF] Fix blurry images
This is a very annoying design flaw in WPF: by default, when you include a bitmap image in a view, it appears blurry. Here I’ll describe why it behaves like this, and then give a solution.
Showing the problem
I created a sample Bitmap file with vertical and horizontal lines. The lines are spaced by one pixel, making a very sharp pattern.
{<1>}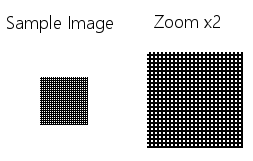
Now let’s try this simple XAML snippet:
<Window>
	<Image Source="SampleImage.bmp" Stretch="None"/>
</Window>
Here is the result:
{<2>}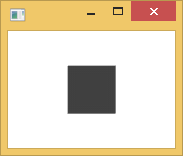
As you can see, the lines are not visible because the image is so blurry that the whole thing melted into a flat gray square.
But if we align the image like this:
<Window>
	<Image Source="SampleImage.bmp" HorizontalAlignment="Left" VerticalAlignment="Top"/>
</Window>
The same image is perfectly rendered:
{<3>}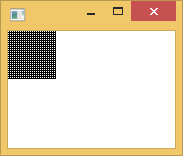
Why WPF does that?
WPF is designed to be device independent, so it relies on a logical coordinate system, instead of the pixel unit. The logical unit is defined as 1/96 of an inch (0.27 mm) and it is scaled according to the screen settings of Windows.
Indeed, when you specify Width=42, you don’t say that the control width is 42 pixels but 11.1 mm. The actual number of pixels will depend on the screen resolution and the DPI configuration.
Back to our problem: since I specified Stretch="None", WPF will bypass the logical coordinate system, so that the rendering size in pixel is the physical size of the picture.
The issue occurs not because of the size of the image, but because of its location. Indeed, the X and Y coordinates are still expressed in device independent unit, as a floating point value. Once converted to pixel coordinate, there is very little probability that the values are rounded.
Why the image isn’t blurry when it’s aligned at the border of the window? Simply because the border of the window is aligned with the pixels, so is the image.
Wrong solution: SnapsToDevicePixels
The first thing you want to try when you have that kind of rendering issue with WPF is to set SnapsToDevicePixels="True".
MSDN documentation says:
Gets or sets a value that determines whether rendering for this element should use device-specific pixel settings during rendering.
It works well when drawing shapes, so one can assume that it’s going to work with image too, right?
<Window>
	<Image Source="SampleImage.bmp" SnapsToDevicePixels="True"/>
</Window>
Here is the result:
{<4>}
Quite disappointing, isn’t it?
Well, actually, there has been an enhancement, look at this close-up:
{<5>}![]()
We can clearly see that the edges a much sharper, but that’s not very helpful.
Good solution: UseLayoutRounding
SnapsToDevicePixels doesn’t fix the blur effect because it works at render time, and it’s already too late: if the layout step decided that the image position is X=34. 2 pixels, it’s not going to change in rendering step.
Fortunately, since WPF 4.0, there is a property that does the same job in the layout step: UseLayoutRounding.
MSDN documentation says:
Gets or sets a value that indicates whether layout rounding should be applied to this element’s size and position during layout.
So let’s try:
<Window>
	<Image Source="SampleImage.bmp" UseLayoutRounding="True"/>
</Window>
And finally here is the result.
{<6>}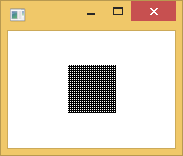
Like many people, I think that this should have been the default value in the first place, but anyway…
If, despite of my first explanation, you still don’t see the difference between SnapsToDevicePixels and UseLayoutRounding, you can see it like this: it’s exactly the same difference that you have between RenderTransform and LayoutTransform.